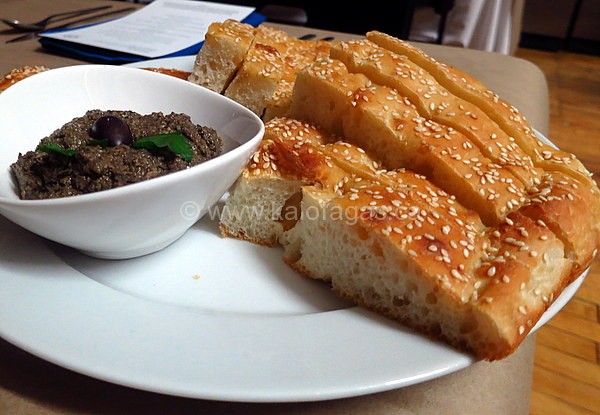
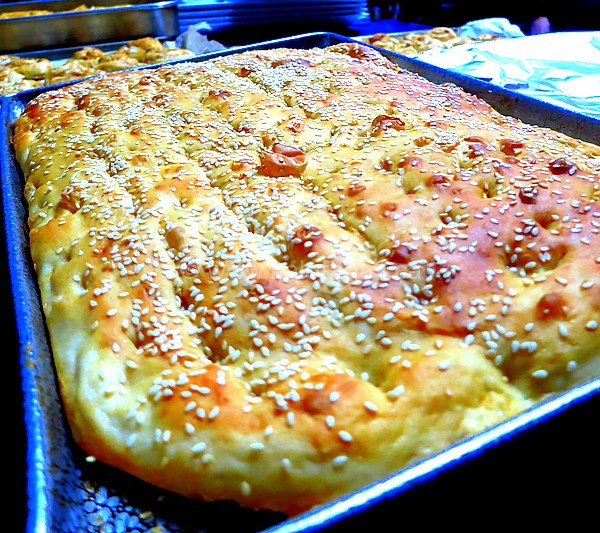
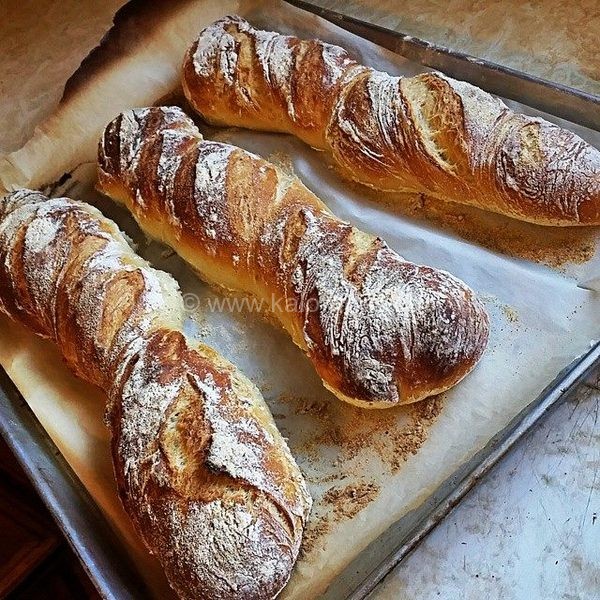
Lagana is very reminiscent of foccacia, another flat bread. The Lagana is a bread that’s tradionally baked for consumption on the first day of Greek Lent, Clean Monday.The Lagana is very easy to make and if you mix a batch of dough this evening or start tomorrow evening, you can have home-baked Langana for Kathera Deftera (Clean Monday).
The dough recipe is a riff on the Artisan Bread in 5 Minutes master recipe and the dough is easy, forming the Laganes are simple and the result? Delicious.
The traditional topping for Lagana are sesame seeds. Now’s not the time for recipe twists.
Lagana (λαγάνα)
(makes 2)
baking sheet covered with parchment paper
2 tsp. of active dry yeast
1 tsp. of sugar
1 1sp. of coarse sea salt
1 1/2 cups of room temperature water
3 1/2 cups of all-purpose flour
Sesame seeds
Pre-heated 375F oven
In a largebowl, add your luke-warm water, yeast and sugar and stir to mix. Allow the yeast a few minutes to activate. Now add the flour and the salt and mix thoroughly with a heavy wooden spoon. You may also use your bread mixing attachment on your Kitchenaid (or whatever brand you have). If the dough mixture still looks to dry, add some more water in increments.
Cover the bowl with plastic wrap and allow to rise for 60-90 minutes or until doubled in size. min. You may do this step just before bedtime too!
Take the wrap off the bowl, treat your hands with some flour, punch the dough down and empty onto your work surface. Divide the dough into two.
Using your hands (treat with flour), form your Laganes (should be rectangular shaped with rounded ends) with your fingers. Pinch, rotate and let gravity help you form the shape. Place each piece of dough on your parchment-covered baking sheet ( 2 Laganes to each tray) and continue to form the Lagana by stretching it into shape.
Allow the dough to rest and rise again for another 45-60 minutes. Pre-heat your oven to 375F oven (middle rack). Sprinkle each Lagana with sesame seeds.
Fifteen minutes before baking, using your fingertips, poke-down each Lagana to deflate and make indents. Place in the oven and bake for 30-35 minutes. Place on a cooling rack to…well, cool.
If you are not reading this post in a feed reader or at http://kalofagas.ca then the site you are reading is illegally publishing copyrighted material. Contact me at truenorth67 AT gmail DOT COM. All recipes, text and photographs in this post are the original creations & property of the author.
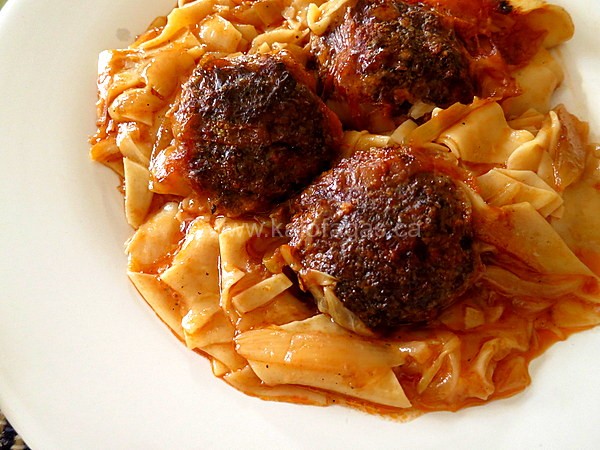
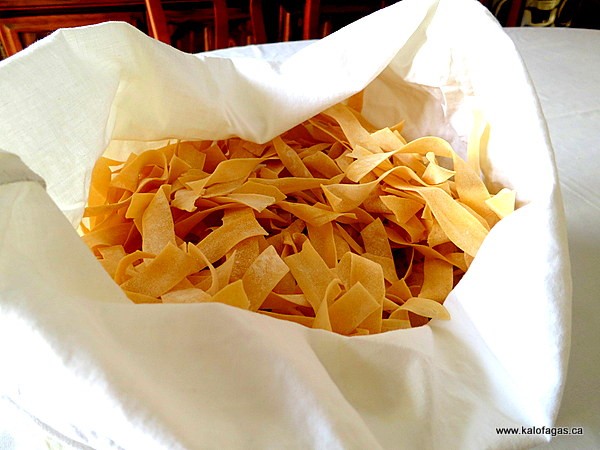
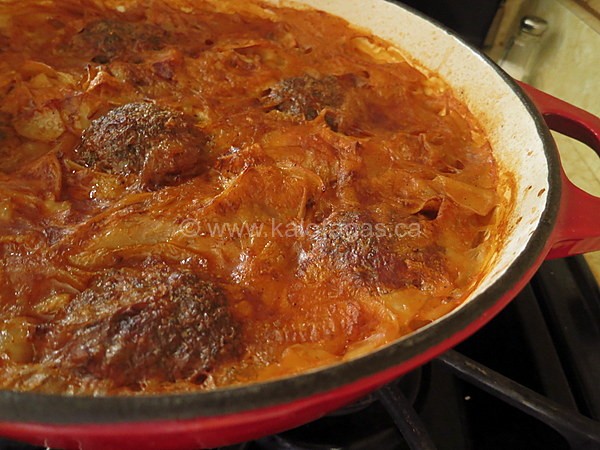
Many of the comforting dishes on this blog come from recipes my Dad loves to eat or in some cases, his recipes that he makes (and shares). My father loves keftedes, Greek meat patties if you will. He loves pasta and my parents tell me about homemade pasta they used to enjoy as children when they were growing up in Florina (northern Greece).
These were egg noodles, made without a pasta machine – simply rolled out then cut into broad noodles and left to dry out and stored in pillow cases. They resemebled thick bread crusts and in Florina they call these egg noodles “kores”.
The base flavouring for this dish is onions, lots of onions, some red peppers, garlic, tomatoes and of course, the olive oil. Simplicity rules here – basic execution and just use quality products like a good ground beef, tomato paste (or fresh tomatoes when in season), and if possible, homemade or good egg noodles.
The result, a comforting plate of noodles in a tomato and onion sauce, aromatic and moist keftedes and all you need is spinkle of Boukovo, grated cheese and a glass of wine.
2 Tbsp. tomato paste OR 3 large ripe tomatoes, grated
250 gr. broad egg noodles
4 1/2 cups hot stock or water
1/2 cup chopped fresh parsley
salt and pepper to taste
Garnishes
sprinkle of Boukovo (chilli flakes) or fresh ground black pepper
grated dry Mizithra cheese
Pre-heated 375F oven
Prepare the recipe for 1lb. of Keftedes, form into palm-sized patties and reserve. Meanwhile, place a oven safe large but shallow Dutch oven on your stovetop over medium-low heat. Add the olive oil, onions, garlic, peppers and sweat for 15 minutes or until onions are soft, translucent.
Add the tomato paste, paprika and stir in, cooking for 2 minutes. Add the stock and bring up to a boil then add the noodles, parsley, salt and pepper to taste and once boiling again, place uncovered in the pre-heated oven for 30 minutes.
Take out of the oven and place the keftedes on top and return to the oven for another 20-30 minutes or until the the liquid has been absorbed and the keftedes have browned on top.
Take out of the oven, allow to rest 10 minutes before serving. Divide and plate and top with Boukovo and grated dry Mizithra. Serve with Kir Yanni Paranga.
This year, Easter falls on April 20th and for us Greeks (and many Orthodox Christians) it wouldn’t be the same without Tsoureki at the table. Last year I sold some Tsourekia and the response was tremendous and the feedback was all positive. People loved my Tsoureki!
For those asking, Tsoureki is an Easter brioche with aromas of mastiha, mahlepi, orange zest and it’s texture is light, fluffy – I could eat the whole loaf!
I am now taking pre-orders for Easter Tsourekia, for pick-up only in the east-end of Toronto, cash/paypal.
LAST ORDER ACCEPTED APRIL 12th, each Tsoureki is $10.
Email me at truenorth67 AT gmail.com to place your order.
Here I am, mid-week into the first week of Lent. The first day is the hardest and then each day it becomes easier and easier. One meal that’s a challenge is breakfast. I eat breakfast, rarely skip and when I do, I fell out or sorts – almost ill for the rest of the day. Eat your breakfast folks.
With breakfast options being restricted (no butter, no cream for coffee and no cheese or eggs, I leave the table in the morning a little hungry. Part of the solution are these Lenten (Nistisima) Paximadia. Paximadia are, a twice baked cookie that’s perfect for having with coffee.
I’ve been enjoying anew my Greek coffee (one in the morning and one in the afternoon) and a Paximadi or Kouloraki is always nice to have/serve with the coffee. These Paximadia are Lent-friendly in that there are no eggs or dairy…just flour, spices, sugar, and orange juice and zest and some white wine.
These Paximadia will not get you drunk but they will making fasting a little easier. Grab your notepad, I’ll put the coffee on and we can dream about that Easter Feast coming in early April.
Nistisima Paximadia
zest and juice of 1 orange
3/4 cup vegetable (sunflower) oil
1/2 cup dry white wine
1 1/2 tsp. ground cinnamon
1/4 tsp. ground cloves
3/4 cup sugar
1/4 tsp. baking soda
1 heaping Tbsp. baking powder
1/2 cup almonds
3 cups of all purpose flour (+ more if necessary)
sesame seeds
Pre-heated 350F oven
Pre-heat your oven to 350F. In a food processor, add the orange juice, zest, wine, vegetable oil, cinnamon, cloves, baking soda, baking powder and sugar. Process until mixed well. Now add your almonds and pulse until they look like they are roughly chopped.
Empty the contents into a large bowl and now gradually add your flour and mix in with your hands. You will need approx. 3 cups of flour. Your dough should be smooth to the feel and not tacky. Add more flour if needed.
Gather your dough and knead it into a ball. Turn onto your work surface and divide into 3 pieces. Form into three loaves. Place some sesame seeds on some parchment and then place a loaf of dough in it. Wrap the parchment around the loaf so that the sesame seeds adhere to the dough. Repeat with the other two loaves.
Place the sheet of parchment paper on your baking tray and lay your three loaves of dough on top. Place your tray on the middle rack and bake for 30 minutes. Remove from the oven and cut the loaves into slices with a serrated knife. Arrange the cookie slices flat on the baking tray.
Turn down the heat of your oven to 300F and bake for another 10 minutes. Now turn off your oven and allow the cookies to cool in the still warm oven.
Remove the Paximadia and store in an airtight container for up to 6 weeks.
If you are not reading this post in a feed reader or at http://kalofagas.ca then the site you are reading is illegally publishing copyrighted material. Contact me at truenorth67 AT gmail DOT COM. All recipes, text and photographs in this post are the original creations & property of the author.
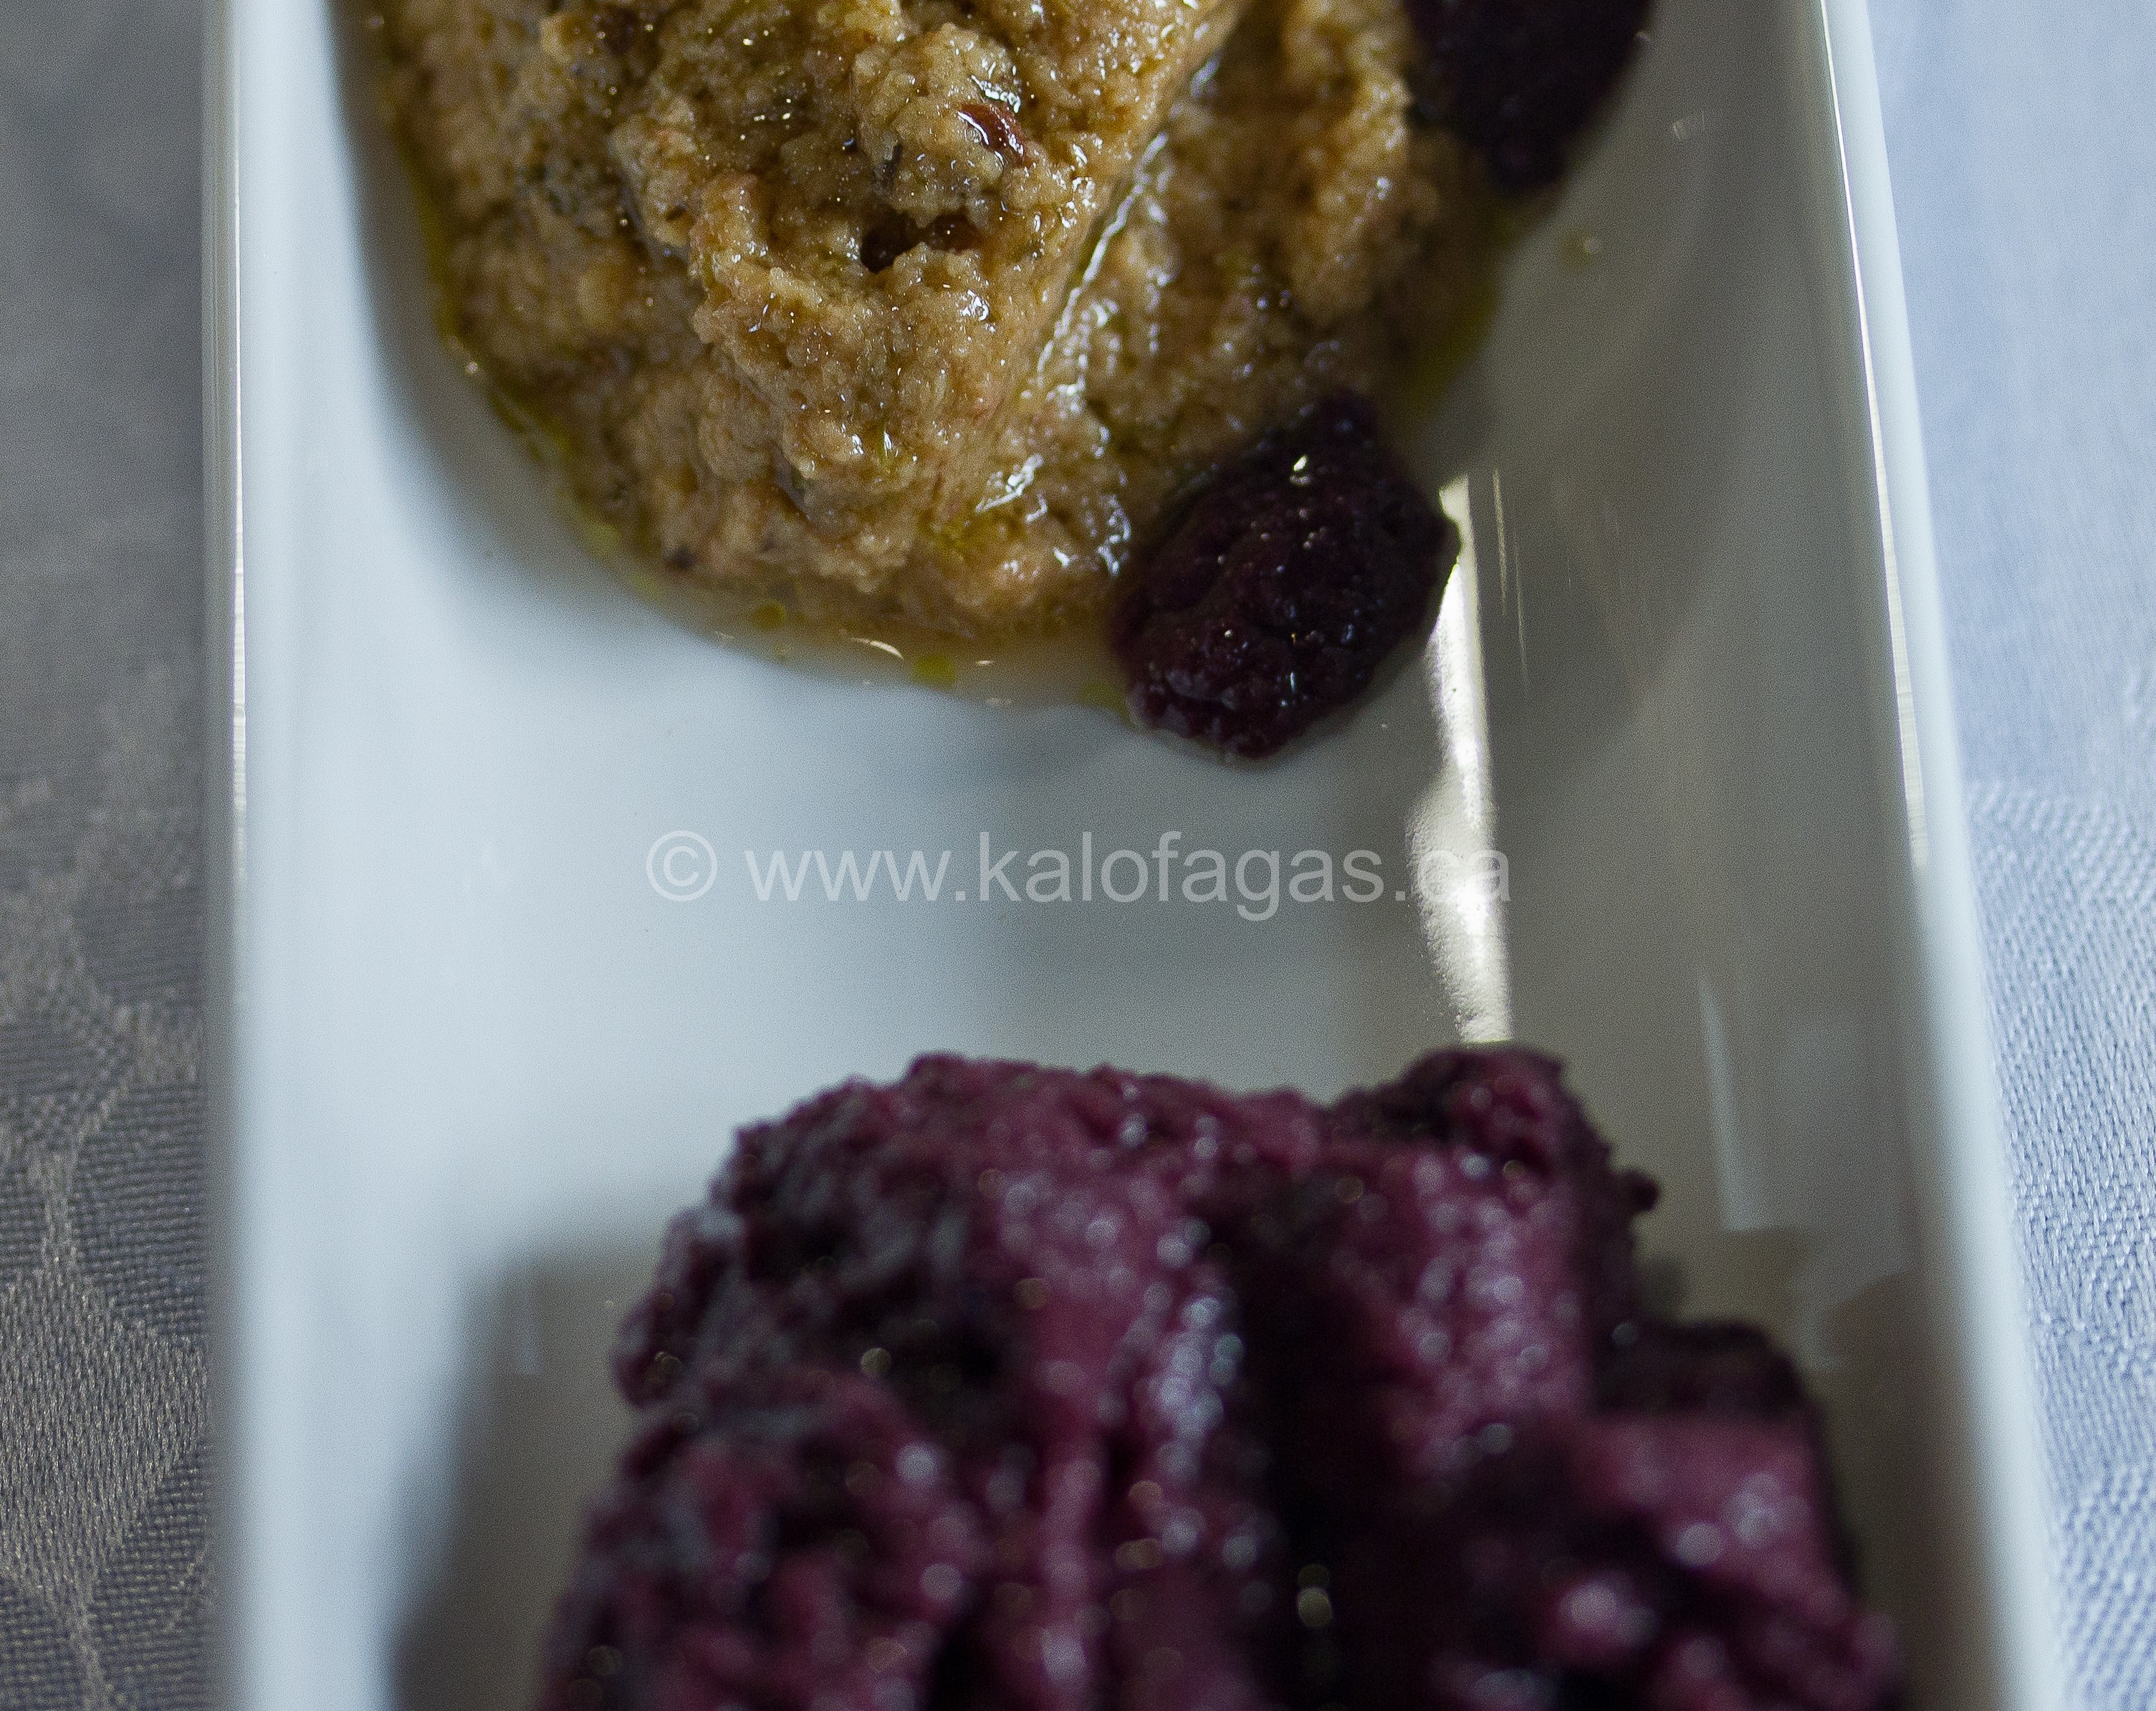
I came up with this recipe after having an epiphany that I must once again have and enjoy the flavour combo of walnuts and figs in a recent salad with this same glorious pairing of walnuts and figs. In that post, encouraged you to place a walnut and dried fig in your mouth to prove my point. Today, I’m encouraging you to try these Paximadia with figs, walnuts and ground star anise.
You could call these biscotti but us Greeks call them Paximadia. Paximadia or dried rusks/breads which have been around since ancient times. Cookbook author Georgia Koufinas says that Paximadia used to be called “dipyros”, which means “twice baked’. The Greek word Paximadi can be traced to a barley rusk named after a late Hellenistic Period cook named Paxamus (1st Century AD). Paximadia were the food of the poor as they were made of coarse grain flours and kept well on long journeys thereby earning it’s place in the pantries of farmers and sailors. Paximadia were the basic food of Byzantine armies and later the Venetian armies. Italians call Paximadia “biscotti”, also meaning “twice baked”.
The third flavourful ingredient for these Paximadia is star anise. Reminiscent of anise but much more complex, exotic and wonderful with figs. Star anise is not a widely used spice in Greece but that’s not to say it’s not used at all either. At a tour/visit of the Tsantali Ouzo Distillery in Halkidiki and I learned that star anise was one of the ingredients used to make their Ouzo. Ouzo is made from grapes and stems so therefore it’s only fitting than some Petimezi sneaks into the recipe. Petimezi* is a grape molasses and I’ve diluted it here with some water and brushed the tops of the Paximadia with it so that the sesame seeds adhere well.
So, naturally a shot of Ouzo also made it’s way into this easy recipe. This recipe is wonderful for the Christmas holidays and holiday entertaining it’s in full stride and the almost potpourri aromas that fills your home while baking these will set you in the mood for Christmas. These are the perfect accompaniment for coffee or tea and I look forward to dunking a paximadi into my Greek coffee.
If you are not reading this post in a feed reader or at http://kalofagas.ca then the site you are reading is illegally publishing copyrighted material. Contact me at truenorth67 AT gmail DOT COM. All recipes, text and photographs in this post are the original creations & property of the author.
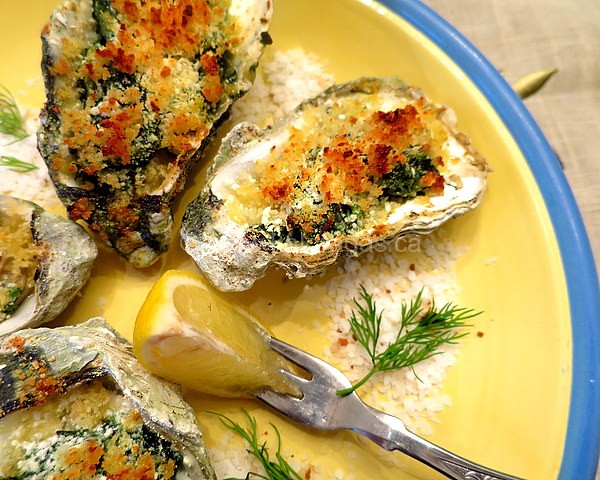
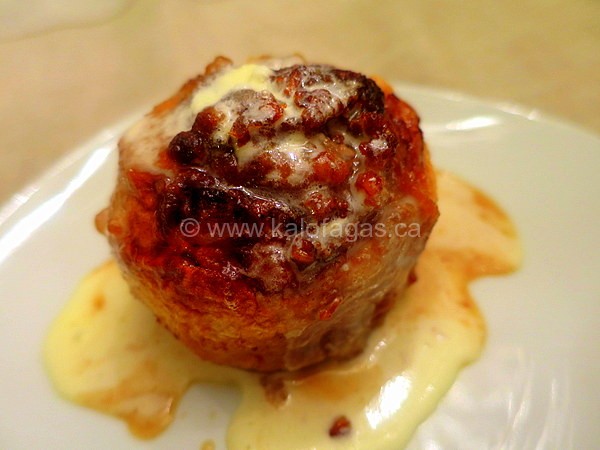
This is my Greek take on Oysters Rockefeller, a dish so rich that it was named after the wealthy Rockefeller family in the US. This dish originated in New Orleans and up to the 80′s it appeared on many steak and seafood restaurant menus.
My Greek take on this classic includes use of a Bechamel, a cooking method introduced by Nikos Tselementes, a man who cooked in Paris hotels and has forever changed the landscape of Greek cuisine.
Spinach, of course is identifiable in Greek cooking and I’ve added Ouzo into the mix and of course, fresh dill. My Rockefeller redux even gets a cheese switch-up with my use of sharp Kefalotyri cheese made from sheep’s milk and a hint of nutmeg.
A little bit of Greek decadence, fit for Ari Onassis. I think the Greek Tycoon would have loved these!
Baked Oysters Onassis
(serves 4)
Bechamel
3 Tbsp. unsalted butter (or olive oil)
3 Tbsp. all purpose flour
1 1/2 cups of warm whole milk
1/2 cup grated Kefalotyri cheese (or sharp Romano)
For the bechamel, add the butter to a medium pot and melt over medium heat then add the flour and stir in for a minute. Add the milk in increments, stir in, repeat until the milk is amalgamated and your bechamel has thickened. Take off the heat, add the grated cheese, nutmeg and stir in until cheese has melted in. Adjust with salt and pepper, allow to cool.
For the spinach, place a skillet on the stovetop over medium heat and add the olive oil, scallions and garlic and sweat for 5 minutes. Add the Ouzo and reduce until there is barely any liquid left. Take off the heat and allow to cool. Add the chopped spinach, dill and stir in. Now add the spinach mixture into the cooled bechamel and stir in. Adjust flavouring with salt and pepper, reserve.
Melt your butter and add to your breadcrumbs and stir/mix with a spoon. Pre-heat your oven to 450F.
Spread the sea salt on your baking sheet and set aside. Now, carefully shuck your oysters and place on the sea salt (the salt keeps the oysters level and from spilling their liqueur.
Place a spoonful of spinach mixture into each oyster then top each with breadcrumbs and the remaining grated cheese. Place on the rack on the top third of the oven and bake for 8-10 minutes or until tops are golden.
Remove from the oven, place on a platter, anoint with extra-virgin olive oil, serve with lemon wedges and dill garnishes. Serve with Hinterland Rose 2011 Method Traditional.
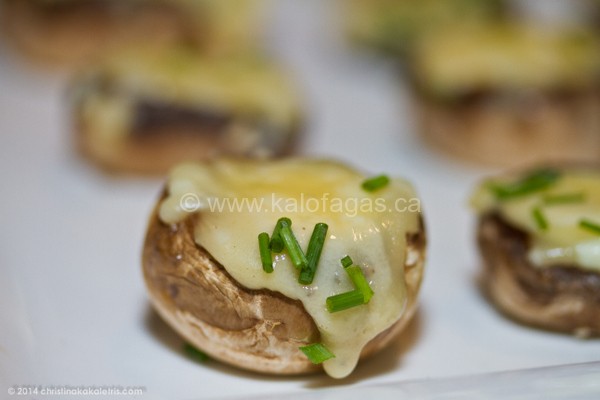
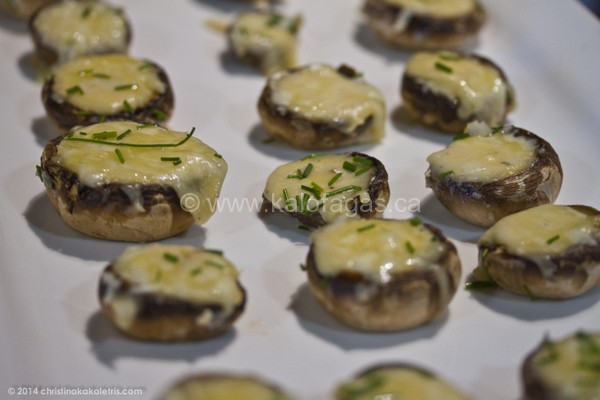
This appetizer was served this past Sunday at my Naoussa-themed Greek Supper Club featuring Thymiopoulos Wines. It’s a rich little bit but ohhh so delicious. This offering is an appetizer so a little decadence is okay and besides, this is an easy appetizer to serve for the coming holiday season.
Basically we’re stuffing mushroom caps with a bechamel sauce that has melted cheese in it plus some accents of garlic and ginger. A little more cheese is sprinkled on each mushroom and in the oven they go. A little fresh chives are sprinkled after they come out of the oven then pop pop pop they go into your mouths.
Baked Mushrooms Stuffed With Kefalotyri Cheese
(serves 6)
approx. 24 small to medium sized white button mushrooms
1 Tbsp. unsalted butter or olive oil
1 Tbsp. all purpose flour
1 cup warm whole milk
1 clove of minced garlic
1 Tbsp. fresh grated ginger
1/2 cup grated Graviera or Gouda cheese
1/3 cup grated Kefalotyri cheese (or Romano Peccorino)
1/4 tsp. fresh ground pepper
+ 1/2 cup combined grated gouda and Kefalotyri cheese for topping
1/4 cup chopped fresh chives
Wipe your mushrooms with a damp towel to remove any dirt/grit then twist off the stems (use for stock or soup). Place on a baking sheet and reserve.
Into a medium pot, add your butter over medium heat and once melted, add the flour and stir for a minute with a wooden spoon. While stirring , slowly add the milk and continue to stir. You may now add the garlic and ginger and once thickened to a bechamel, take off the heat.
Add the grated cheeses, ground pepper and allow to cool (cover with plastic wrap so a crust doesn’t form.
Once your bechamel has cooled, transfer to a piping bag with a small nozzle and pipe the filling into your mushroom caps.
Sprinkle remaining grated cheese on top and place in a pre-heated 350F oven for 20-25 minutes (cheese should be melted).
Take out of the oven, sprinkle chopped fresh chives on top and serve warm.
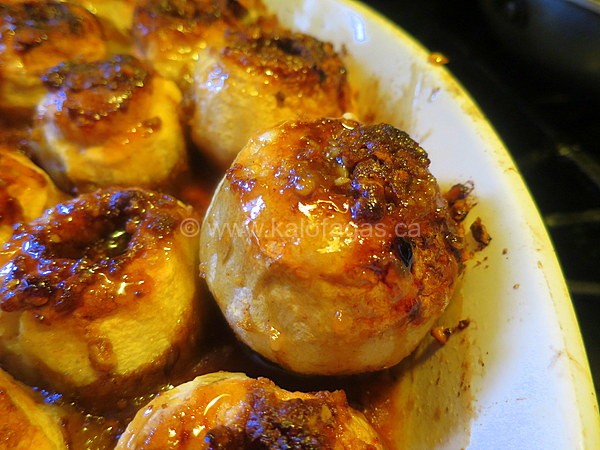
It’s autumn and the markets are teeming with apples…apples to eat as a snack, apples for making apple sauce, apples for pies and apples for baking. Here in Ontario, we must have at least 10 varieties in the marlet – people love apples!
This recipe is quick, easy and it uses ingredients most of us already have in our pantry. Basically we’re peeling/coring apples, stuffing them with a mixture of walnuts, brown sugar and spices and we bake them.
You can play with the spice blend or use another nut (almonds would work) and bake away. Of course, apples and spices pair well with ice cream – a no-brainer.
Baked Apples Stuffed With Walnuts
(serves 6)
6 apples (Granny Smith, Fuji, Gala or Northern Spy)
4 Tbsp. unsalted butter, softened
1 cup brown sugar
1 cup chopped walnuts
1 tsp. ground cinnamon
1/2 tsp. ground clove
1/4 tsp. ground nutmeg
1/2 tsp. vanilla extract
1 cup orange juice or apple cider
1/2 cup maple syrup
French Vanilla ice cream
Pre-heated 375F oven
In a medium bowl, mix the butter, sugar, cinnamon, clove, nutmeg and vanilla, set aside. Lightly grease the sides of a round/oval 8X12 in. shallow baking vessel.
Peel and core the apples and place in your baking vessel then press the nut filling into each cavity with a spoon and press down with your finger.
Gently pour the juice over and around the apples, cover loosely with foil and baked for 30 minutes. Remove the foil, baste the apples with juices and bake for another 30-35 minutes or until golden brown and apples are cooked through (use a thin wooden skewer to pierce/check for apples’ doneness).
Remove from the oven, spoon juices over apples and drizzle maple syrup as well. Allow to cool for 10 minutes. Serve warm with ice cream.
Christmas is almost here and surely you’ll finalizing your menu and editing down your entertaining options. The holiday conundrum? Coming up with interesting dishes while still being able to spend time with family and friends rather in the kitchen.
Help is here with this quick (even make ahead) chocolate cake recipe that essentially requires you to melt butter and chocolate then mix it into an egg and sugar mixture with some orange flavourings.
If you don’t like orange, you may omit as it won’t throw off the ratio of your cakes. Regardless, these are rich, dense cakes that will satiate the chocolate fanatic in all of us.
Use a quality bittersweet chocolate and you may use ramekins or muffin tins to bake them. Enjoy!
Easy Chocolate and Orange Cakes
(serves 4)
1 stick of unsalted butter
180 gr. of bittersweet dark chocolate
3 large eggs
1/3 cup granulated sugar (plus extra for coating ramekins/muffin tins)
pinch of salt
2 Tbsp. finely ground almonds
2 Tbsp. of all purpose flour
1 tsp. vanilla extract
zest of 1/2 to 1 orange (according to taste)
splash of orange liqueur
Place a medium pot (with about 3 inches of water in it) on your stovetop over medium heat, place a metal or glass bowl on top. Into the bowl, add chocolate and butter and melt the two while occasionally stirring.
Meanwhile, add your eggs, sugar, salt, almonds, flour, vanilla, zest and liqueur into a large bowl and beat with a hand mixer until creamy and pale in colour (about 5 minutes).
Meanwhile, grease the insides of your ramekins/muffin tins with butter and coat the insides with sugar (empty excess).
When the chocolate has melted, take off the heat and pour into the egg mixture while whisking. Now divide and pour into ramekins/muffin tins.
Pre-heat your oven to 375F (middle rack) and bake for 13-15 minutes (or check for doneness by sticking a toothpick into middle of cake).
Take out of the oven, allow to cool. Loosen cakes from molds and plate slightly warm or room temperature with a dollop of whipped cream and some raspberries as garnish.
*TIP: you can premake the batter and place covered in the fridge for up a day, just return to room temperature before baking.
Can you think of a more delicious way to spend a holiday than in a Greek kitchen? In this hands-on, full-day workshop, Greek food enthusiast, talented cook and cookbook author Peter Minaki will walk you through a variety of authentic Greek specialities, from starters to mains, sides and desserts. The class will cover techniques such as making phyllo pastry and loukoumades from scratch, and includes a gourmet lunch, a coffee break with homemade Greek sweets, and whole spiral cheese pie to take home.
Phyllo from scratch!
The class starts with making dough for phyllo (or filo), the delicate paper-thin sheets of pastry (from the Greek φύλλο for leaf) have been a Eastern Mediterranean delicacy for hundreds of years. This dough needs to rest for a few hours to completely hydrate in order to have the elasticity needed to be stretched very thin.
Lamb Giouvetsi
While the dough is resting, we’ll start to prepare lunch, a traditional giouvetsi of lamb and orzo (a rice-shaped pasta). As a time-saver, Peter will demonstrate how to create incredibly tender, flavourful lamb in a fraction of the time using a pressure cooker.
Loukoumades
While the lamb cooks, you’ll prepare the soft dough for loukoumades, one of the all time favourite Greek desserts! These crispy bite-sized sweets will be fried and soaked in a honey syrup and garnished with walnuts and cinnamon in time for the afternoon coffee break, but first the dough needs to rise.
Lunch
The cooked lamb is then combined with veggies and orzo in traditional terra cotta dishes and baked. While it bakes, you’ll prepare a crisp, refreshing salad of romaine, scallions, dill, sprinkled with wine vinegar and extra virgin olive oil. Piping hot out of the oven, the giouvetsi is topped with shredded Greek cheese and lunch is served!
Καλή όρεξη! (Kalí óreksi!)
Paximadia
After lunch we will prepare paximadia, a crunchy Greek cookie similar to a biscotti, studded with figs, star anise and walnuts. Into the oven they go! Time to fry up the loukoumades.
Strifti (Spiral) Tyropita (Cheese Pie)
Next up it is time to prepare the delicious savoury cheese filling for the spiral cheese pies). We can then stretch out the phyllo dough and each participant gets to prepare their phyllo into a cheese pie to take and enjoy at home.
Greek Coffee Break
After popping the kichi kozanis in the oven, Peter will brew up some authentic Greek coffee to enjoy with your fresh paximadia & loukoumades while your pies are baking.
At the end of the class, participant get to take their fresh kichi kozanis home to eat or freeze, along with any leftover paximadia & loukoumades.
This event will run from 10 am to about 5pm.
$125 +HST Family Day Special: Bring kids for ½ price!
Happy New Year everyone! This is the first post of 2011 and it’s a dish that takes me back to Thessaloniki, perhaps it will trigger some of your memories? I first had a Kotopita (chicken pie) at a taverna in Thessaloniki, in the Agia Sophia area in fact. A Kotopita is made of filling of primarily chopped/shredded chicken meat and sandwiched between several layers of phyllo pastry. A strained Greek yogurt or a side of “paprika”, a kind of red pepper-based condiment that resembled ketchup but with the thickness of tomato paste.
We have odes to both the Kotopita and paprika today. The Kotopita (chicken pie) comes from Chef Sofia Georgakaki, originally from the Toumba area of Thessaloniki and she’s a fan of PAOK soccer club (naturally). I’ve came to learn of Sofia through television as she’s a contestant on Greece’s premier season of Top Chef. Sofia was doing some show promo on the station’s morning show and she also showcased her Kotopita for the viewing audience. This recipe is ideal if you have leftover turkey meat or one can buy one of those roasted chickens that are always ready for pick-up at your neighborhood supermarket.
I loved Sofia’s recipe as the filling wasn’t just chicken, the result was a moist pie with the crunch of crisp phyllo and the undertones of mushrooms, fresh sage and smoked cheese. The true test of this dish was re-heating it as a leftover and yes….still moist and very flavourful.
I’ve tweaked the recipe by adding some sweet paprika into the filling, used clarified butter for brushing the phyllo and I’ve tweaked my paprika sauce as the accompaniment to the Kotopita. The “must do’s” in this recipe is the smoked cheese, fresh sage and paprika sauce on the side. In Greece, the popular smoked cheese is from western Greece, the province of Epirus where some of Greece’s best Feta is also made. The town of Metsovo is “foodie destination” with it’s tradition of homemade sweet and savory pies, sausages, wine-making, homemade pasta and cheese production. The famous Metsovone cheeses are formed in cylindrical shape and of particular popularity is the smoked Metsovone, with its brown rind (and smoky aroma).
brought some Smoked Metsovone back from Greece
Smoked Metsovone is not something you will find in your area but you will find other smoked cheeses. As a substitute, I like using a smoked Gouda. As your grocer or deli for it and they should be able to direct you to their location in the cheese display. Get some smoked cheese and while you’re out shopping, grab some fresh sage…ideal for chicken, mushrooms and remarkably wonderful with the cheese too! Dried sage will work in a pinch but if fresh is available, it’s worth the splurge.
The paprika sauce here has been tweaked from a recipe I featured last September with some Keftedes. I’ve adjusted the recipe to suit the Kotopita and the pairing worked wonderfully. This paprika sauce begins with a roux and the remaining ingredients are whole milk, grated Kefalograviera and Feta cheeses and some sweet paprika. Serve a square of Kotopita with a dollop of the Paprika sauce and simply take a piece of the pie, swipe it into the sauce and savour the mouthful.
Sofia’s Kotopita (Η Κοτοπιτα της Σοφια’ς)
1 whole roasted chicken, meat pulled off the carcass and chopped (no skin)
OR equivalent in roast turkey meat (approx. 4 cups)
1/4 cup extra-virgin olive oil
1 large onion, diced
1 lb of button mushrooms, quartered
3 scallions, thinly sliced
1 clove of garlic, minced
1/4 cup of brandy (Metaxa)
2 Tbsp. chopped fresh sage (or 1 tsp. dried)
3/4 cup of half & half cream
3 eggs
1 cup of cubed Metsovone cheese (smoked Gouda works well here)
450 gr. package of phyllo pastry, thawed overnight in the fridge
1 lb. of unsalted butter, (optional to clarify it)*
In a large, skillet, add the olive oil over medium heat and add the onions, scallions, garlic and mushrooms and saute while occasionally stirring for 5-6 minutes or until softened. Season with some salt and pepper and now add the brandy and stir in until absorbed. Now add the chicken (or turkey meat) and stir in and warm through for 2-3 minutes. Take off the heat and add the chopped sage and adjust seasoning with salt and fresh ground pepper (be careful with the salt as you will be adding cheese soon) and remove from the heat and allow to cool (transfer to a bowl to cool quicker). Now add the cheese.
In a bowl, add the cracked eggs and cream and whisk and add the beaten egg/cream mixture to the chicken and stir until well incorporated and reserve.
Remove your thawed phyllo from the fridge and allow it to come to room temperature (15 minutes). Count out your phyllo sheets and divide separate into two piles with one pile having two extra phyllo sheets. One pile will layer the bottom part of the pie (with extra sheets) and the second pile will top the filling (and pie). You may use either a rectangular roasting pan or circular large pizza pan – your choice.
Begin laying the first pile of phyllo, leaving the edges hanging over the sides of the pan. Brush each sheet generously with the melted butter. Empty the chicken filling into the pan and spread evenly.
Fold the excess phyllo over and into the pan and evenly distribute the remaining sheets of phyllo (second pile) to entirely cover the filling. Again, ensure that each sheet is brushed generously with melted butter. Place the chicken pie in a fridge to cool or other cool place to slightly chill, so as to make cutting the phyllo easier. Cut the top layers of phyllo into squares and pre-heat your oven to 350F, middle rack position. Brush the top of your Kotopita with any remaining butter and place in your pre-heated oven for 45 minutes or until golden-brown.
In the meantime, make the Paprika Sauce by warming up some milk in a pot and reserve (keep warm). In another pot, add the butter and onions over medium heat and once it melts, add the flour and stir with a wooden spoon for a minute. Now a grab a whisk and while stirring, add a little bit of warm milk and sweet paprika. As soon as the milk is absorbed, add some more milk while stirring.
Now add the grated Kefalograviera and Feta cheese and as soon as it has incorporated into the sauce, stir for 30 seconds and take off the heat. Add the Greek yogurt, adjust seasoning (more cheese) or if you like the sauce a litter thinner, add a splash of milk. Remove from the oven and allow to cool 15 minutes before serving with the Paprika Sauce. Serve a piece of Kotopita on a plate with some sauce.
Serve the Kotopita as an appetizer, part of array of mezedes or a light meal with a salad. Pair with a Gerovassliou Sauvignon Blanc fumé, ideal for the smoked Metsovone cheese and chicken.
*To clarify your butter, add it to a pot and melt over medium heat. Once melted, take off the heat and allow to cool completely. Place in the fridge and allow to harden. Your clarified butter has hardened on the top and the why and water are in the bottom. Poke a hole and carefully drain-off and discard the water/why. What you have left is clarified butter.
If you are not reading this post in a feed reader or at http://kalofagas.ca then the site you are reading is illegally publishing copyrighted material. Contact me at truenorth67 AT gmail DOT COM. All recipes, text and photographs in this post are the original creations & property of the author.
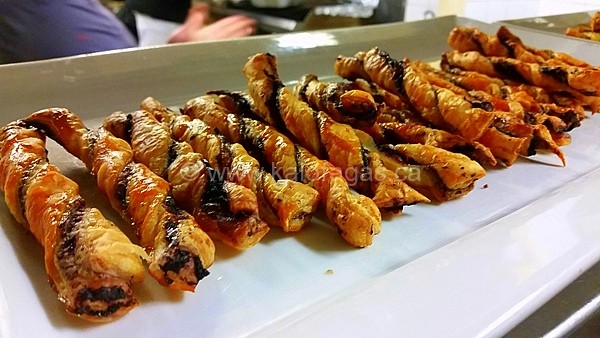
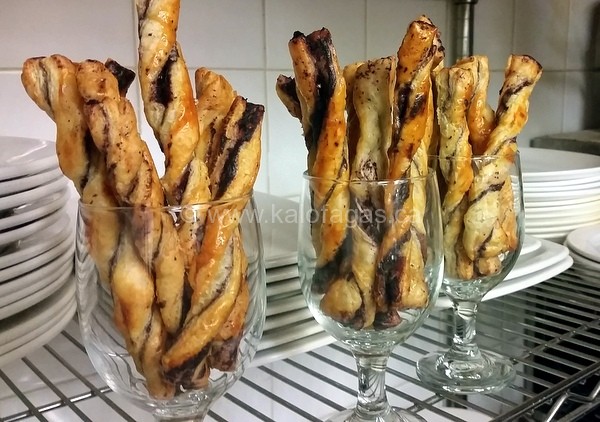
Here’s a quick and easy appetizer you can prepare with just three ingredients….puff pastry, olive paste and the eggwash for finishing. I served these at last week’s Greek Supper Club and for something that contained so few ingredients…they had a complex taste, definite umami factor from the olive paste.
Puff pastry comes in two forms…a package with two bricks that you have to roll out then there’s puff pastry that is already rolled out for you…just defrost in your fridge, unroll and use. Here in Canada, I like using the PC Butter Puff Pastry product.
Lately I’ve been enjoying this black olive paste from Nisos Importing, a new Canadian company that brings in Cretan olive oil and green and black olive paste.
Puff Pastry Twists With Black Olive Paste
(makes 32 twists)
1 package of PC Butter Puff Pastry, thawed overnight in your fridge
approx. 1/4 cup of Cretan black olive paste
1 egg, beaten
Sprinkle some flour on your work surface place one sheet of pastry on top. Place about 1/4 cup of olive paste on the pastry and spread evenly all over the surface with an off-set spatula.
Now place the second sheet of puff pastry over the other and lightly press down.
Take a pizza cutter and cut 16 (1 cm) ribbons along the widest side of the pastry. Now dissect those ribbons in half and you have 32.
Pre-heat your oven to 425F and place some parchment on a large baking tray. Carefully separate the ribbons and twist the ends in opposite directions to form a spiral and place on the tray.
Brush the tops with eggwash and place in your pre-heated oven (middle rack) for 13-15 minutes or until golden brown.
Serve warm or room temperature (or you can make earlier that day and reheat before serving).
I am excited to be teaming up with Mouton Vert’s Maggie Barakaris for a Greek Easter cooking workshop. We’ll share our family’s recipes for making Easter Koulourakia (cookies), Paximadia (Greek biscotti), we’ll dye Easter eggs using natural dyes and finally, we’ll share our secrets for making the best Tsoureki with an array of braided shapes.
The class is limited to just 12 spots so get’em before they’re gone!
Learn to make:
Paximadia (Greek biscotti)
Koulourakia (Greek Easter cookies)
Make Easter eggs with natural dyes
Learn the secrets to making Greek Easter Brioche (Tsoureki)
Price: $100 (includes all taxes)
Location: Mouton Vert, 6000 Sherbrooke St. West, Montreal
I am excited to be offering a Greek Easter baking workshop, to be held Sunday March 22nd at Aphrodite Cooks Cooking Studio. We’ll share our family’s recipes for making Easter Koulourakia (cookies), Paximadia (Greek biscotti), we’ll dye Easter eggs using natural dyes and finally, we’ll share our secrets for making the best Tsoureki with an array of braided shapes.
The class is limited to just 15 spots so get’em before they’re gone!
Learn to make:
Paximadia (Greek biscotti)
Koulourakia (Greek Easter cookies)
Make Easter eggs with natural dyes
Learn the secrets to making Greek Easter Brioche (Tsoureki)
This year, Easter falls on April 12th and for us Greeks (and many Orthodox Christians) it wouldn’t be the same without Tsoureki at the table. Last year I sold some Tsourekia and the response was tremendous and the feedback was all positive. People loved my Tsoureki!
For those asking, Tsoureki is an Easter brioche with aromas of mastiha, mahlepi, orange zest and it’s texture is light, fluffy – I could eat the whole loaf!
I am now taking pre-orders for Easter Tsourekia, for pick-up only in the east-end of Toronto, cash/paypal/credit card.
LAST ORDER ACCEPTED APRIL 3rd, each Tsoureki is $15
Email me at info AT kalofagas.ca to place your order.
Due to popular demand, I am offering a 2nd (first workshop sold out) Greek Easter baking workshop, to be held Monday March 23rd at Aphrodite Cooks Cooking Studio. We’ll share our family’s recipes for making Easter Koulourakia (cookies), Paximadia (Greek biscotti), we’ll dye Easter eggs using natural dyes and finally, we’ll share our secrets for making the best Tsoureki with an array of braided shapes.
The class is limited to just 15 spots so get’em before they’re gone!
Learn to make:
Paximadia (Greek biscotti)
Koulourakia (Greek Easter cookies)
Make Easter eggs with natural dyes
Learn the secrets to making Greek Easter Brioche (Tsoureki)
Join me for an afternoon where I unlock the secrets to making phyllo pastry from scratch. I will share the basic phyllo dough recipe then show you how to open phyllo by hand.
Here’s a quick and easy appetizer you can prepare with just three ingredients….puff pastry, olive paste and the eggwash for finishing. I served these at last week’s Greek Supper Club and for something that contained so few ingredients…they had a complex taste, definite umami factor from the olive paste.
Puff pastry comes in two forms…a package with two bricks that you have to roll out then there’s puff pastry that is already rolled out for you…just defrost in your fridge, unroll and use. Here in Canada, I like using the PC Butter Puff Pastry product.
Lately I’ve been enjoying this black olive paste from Nisos Importing, a new Canadian company that brings in Cretan olive oil and green and black olive paste.
Puff Pastry Twists With Black Olive Paste
(makes 32 twists)
1 package of PC Butter Puff Pastry, thawed overnight in your fridge
approx. 1/4 cup of Cretan black olive paste
1 egg, beaten
Sprinkle some flour on your work surface place one sheet of pastry on top. Place about 1/4 cup of olive paste on the pastry and spread evenly all over the surface with an off-set spatula.
Now place the second sheet of puff pastry over the other and lightly press down.
Take a pizza cutter and cut 16 (1 cm) ribbons along the widest side of the pastry. Now dissect those ribbons in half and you have 32.
Pre-heat your oven to 425F and place some parchment on a large baking tray. Carefully separate the ribbons and twist the ends in opposite directions to form a spiral and place on the tray.
Brush the tops with eggwash and place in your pre-heated oven (middle rack) for 13-15 minutes or until golden brown.
Serve warm or room temperature (or you can make earlier that day and reheat before serving).
Christmas is coming fast and for us Greeks that means lots of preparations. For Greeks, it is tradition to offer family and friends Kourabiedes, Melomakarona and many many other sweets.
During this class I will show you how to make:
Kourabeides
Melomakarona
Loukoumades
A light lunch with wine will also be served.
Class llmit is 12 (firm)
Cost is $70.00
*No refund in the event of a no-show or cancellation within 7 days of dinner
 Lagana is very reminiscent of foccacia, another flat bread. The Lagana is a bread that’s tradionally baked for consumption on the first day of Greek Lent, Clean Monday.The Lagana is very easy to make and if you mix a batch of dough this evening or start tomorrow evening, you can have home-baked Langana for Kathera Deftera (Clean Monday).